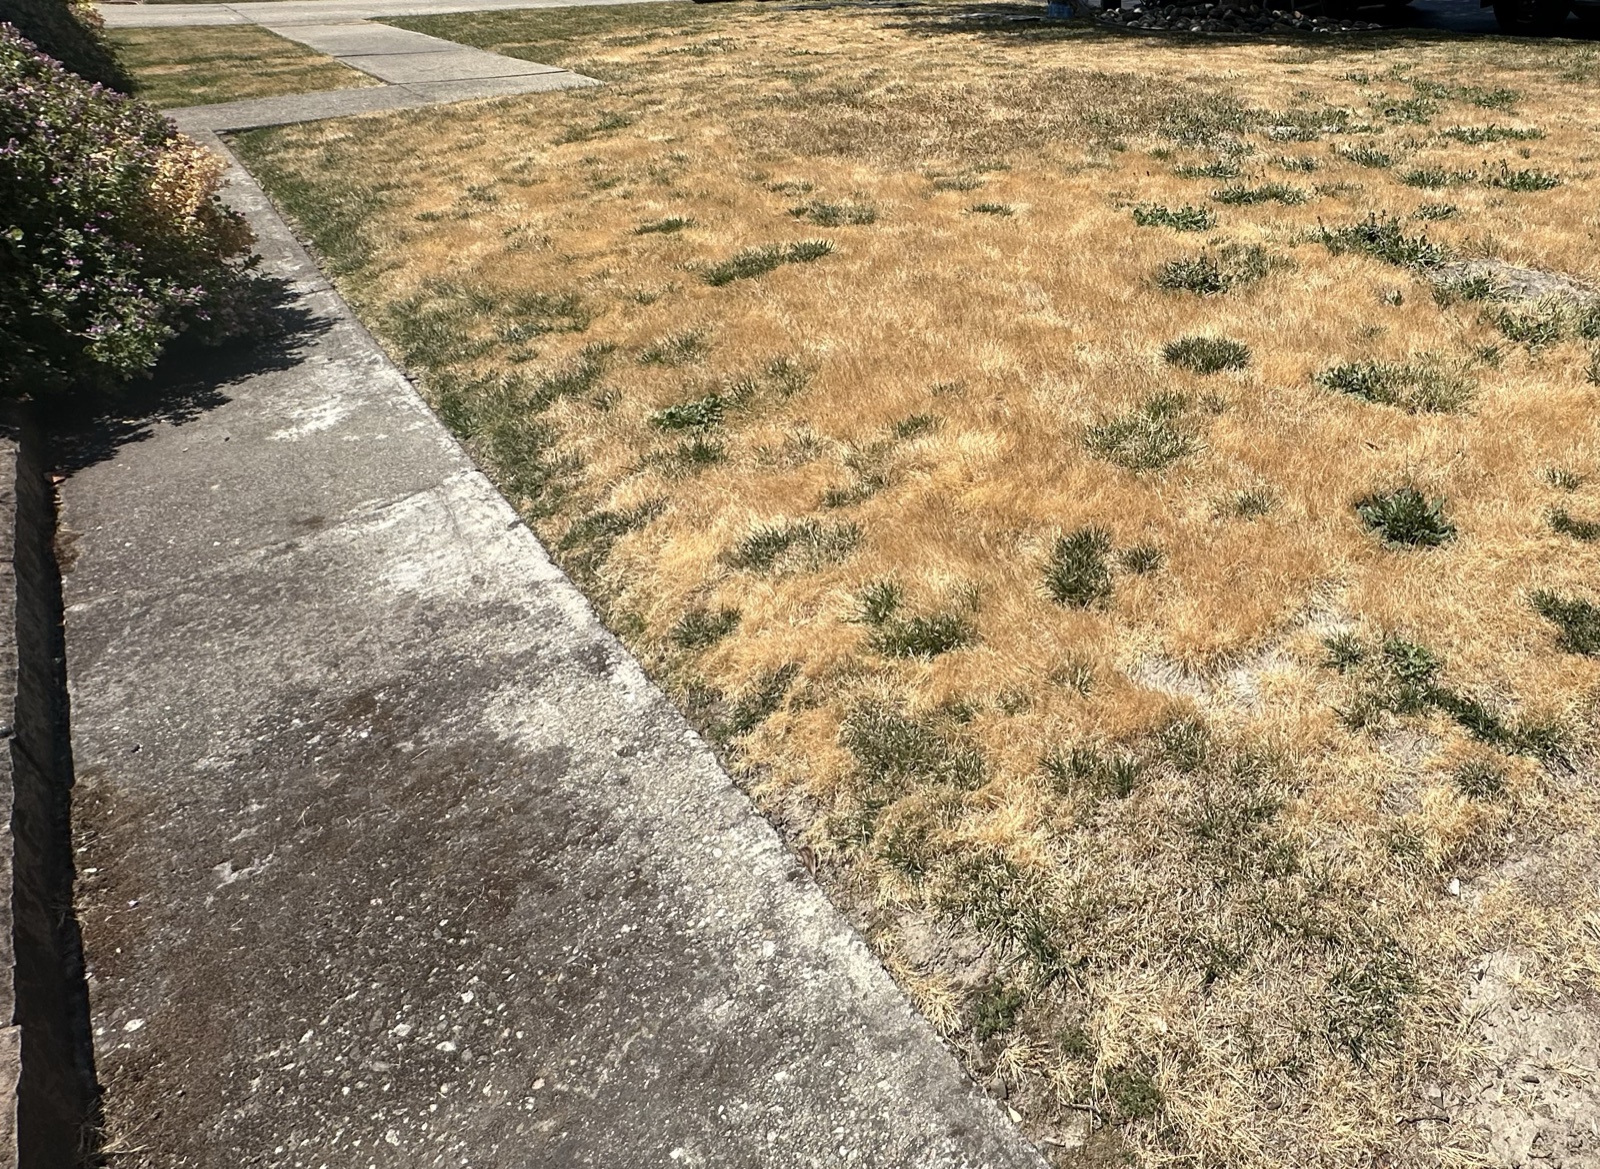
The Before
Our front yard was a water-hungry lawn. Overgrown, neglected, and exactly the kind of combustible fuel load that fire inspectors flag during Zone Zero assessments. Between drought restrictions making the lawn expensive to maintain, MOFD's emphasis on the 0-5 foot non-combustible perimeter, and the reality of living in a WUI community, the yard had become a liability instead of an asset.
We knew it was a problem. We just needed the right push to do something about it. Every property is different -- lot size, drainage, soil conditions, and existing landscaping all affect how a project like this plays out. Check with your local building department for permit requirements, and consult a licensed contractor for drainage or irrigation work.
The Trigger: EBMUD's Lawn Conversion Rebate
EBMUD runs a lawn conversion rebate program that pays you to rip out thirsty turf and replace it with drought-tolerant landscaping. The version we qualified for pays up to $2,000 back if you meet their requirements: remove the lawn, replace with approved drought-tolerant or California native plants, use water-efficient irrigation, and mulch properly (cardboard mulch qualifies).
We saw this as an opportunity to do two things at once: cut our water bill AND build Zone Zero into the front of the house.
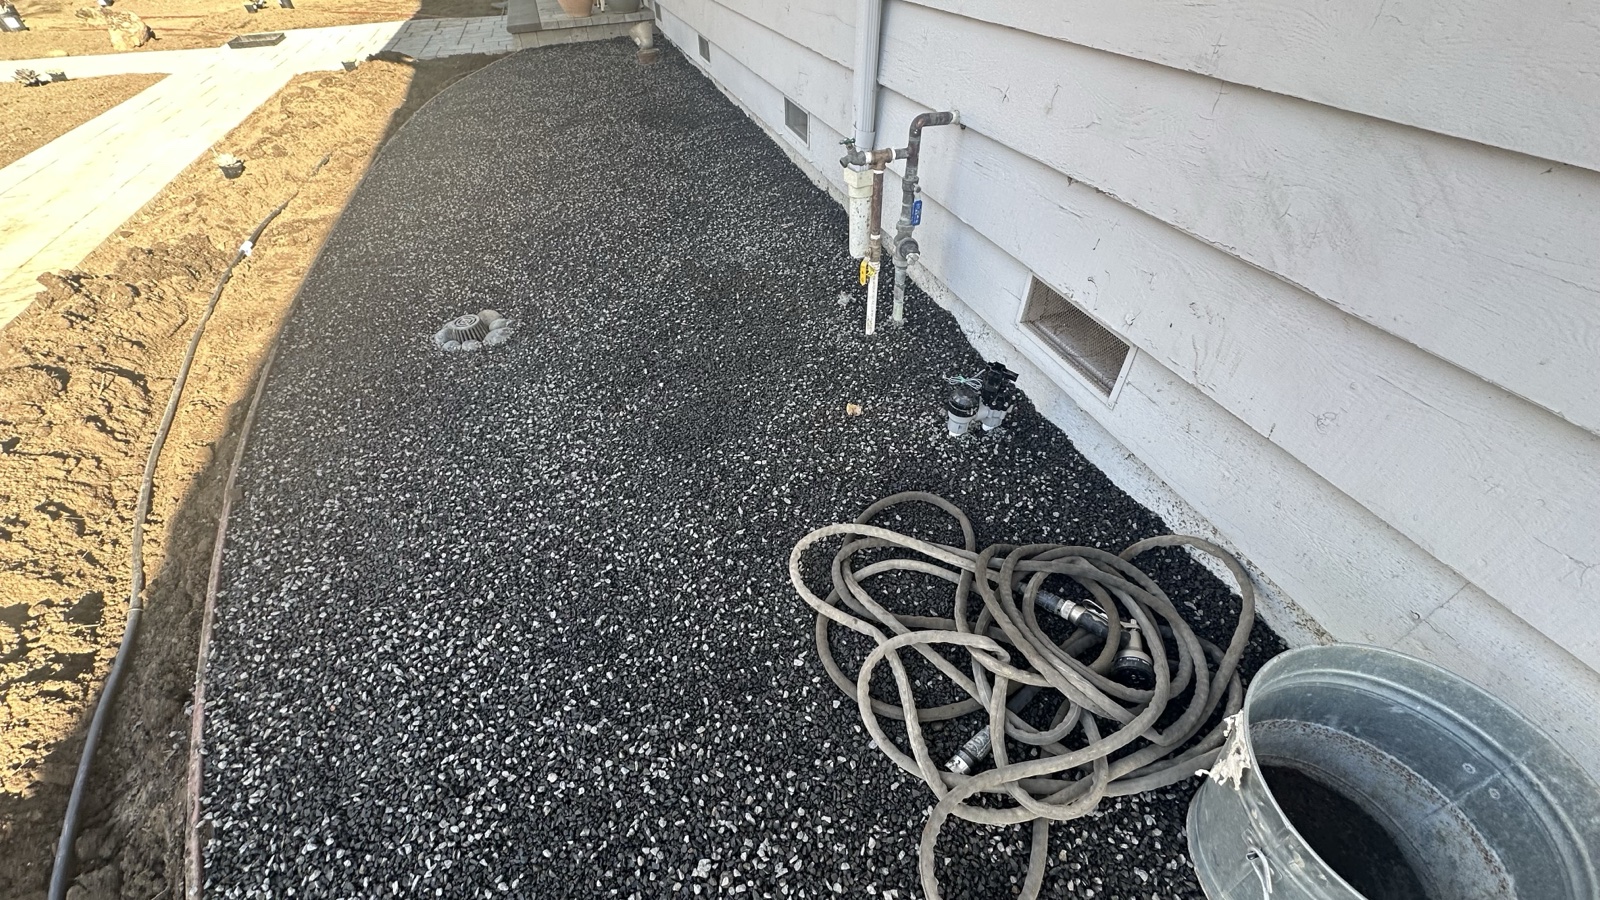
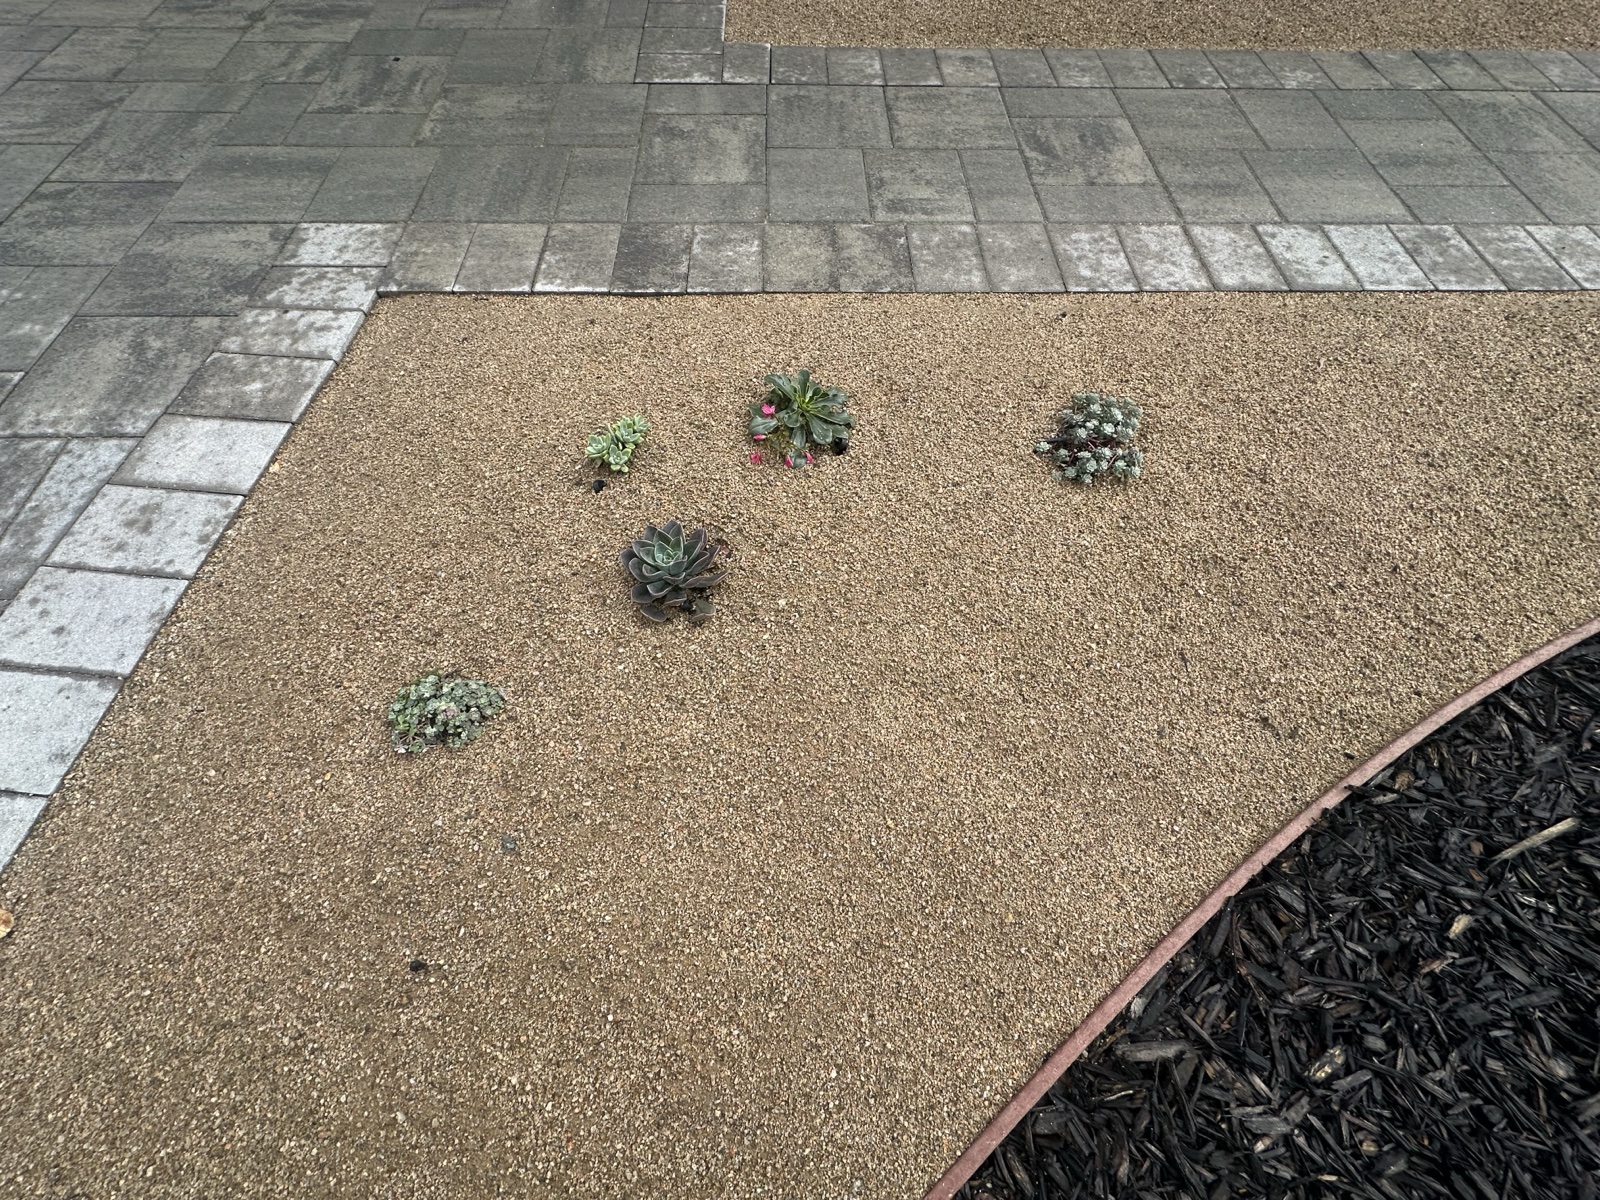
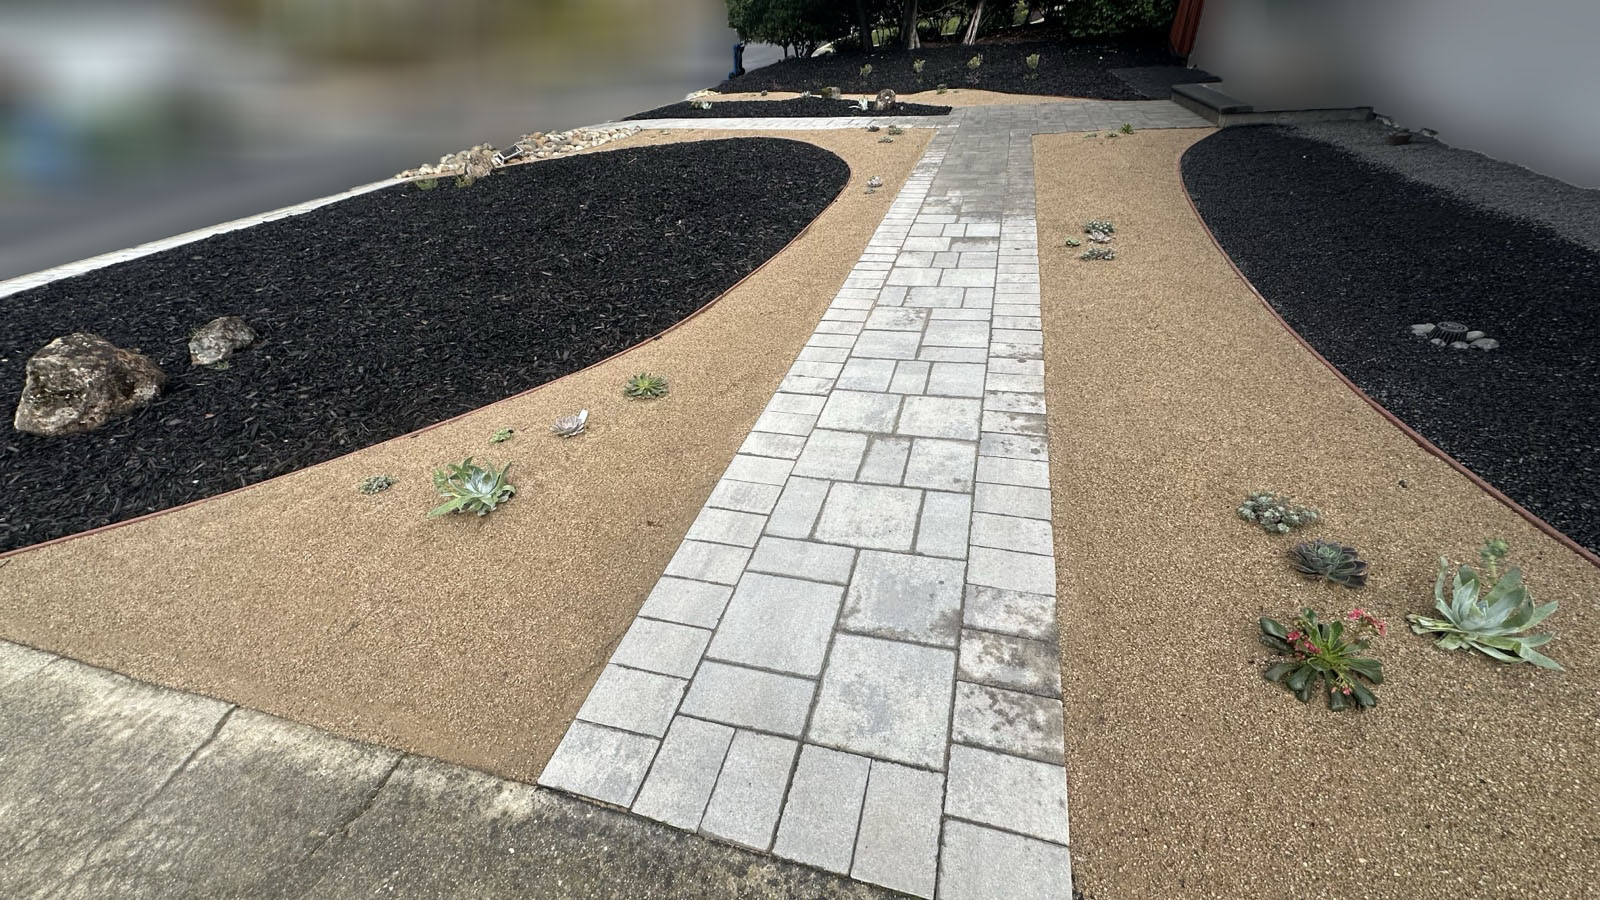
If you're unfamiliar with Zone Zero, it's the first 0-5 feet around your home's foundation, the most critical area for defensible space. Nothing combustible should be within this band. No plants, no bark mulch, no dried leaves. Just mineral ground: gravel, decomposed granite (DG), pavers, or bare soil.
The Design
I designed the landscape myself. No landscape architect. The design priorities, in order:
- Zone Zero compliance. A continuous gravel strip along the foundation, at least 5 feet out from the house wall. Non-combustible. No plants, no mulch within this band.
- Hummingbird-friendly plant palette. California natives selected for year-round blossoms, something in color every season. Sages, penstemons, fuchsias, manzanitas.
- Succulents for expansion. Low-maintenance succulents placed to fill in and spread over time, reducing bare-soil maintenance.
- Aesthetic cohesion. Composite bender board dividers separating the gravel Zone Zero from the planting beds, creating clean visual transitions.
My advice: Design it yourself so you end up with something you actually love. Iterate on paper (or in your head) before anyone touches the ground. And plan ahead. For the Super Rebate, your plants need to be in the ground before end of February, which means you should be applying and planning well before the end of the prior year.
The Build
This was a mixed DIY-and-pro project. Knowing where to draw that line saved us money and headaches.
What I did myself:
- Landscape design and plant selection
- Plant sourcing from California native nurseries
- Ongoing maintenance and training of plants
What the pros handled:
- Demolition (lawn removal, old irrigation tearout)
- Drainage work
- Irrigation replumbing (new drip system tied into our existing smart controller)
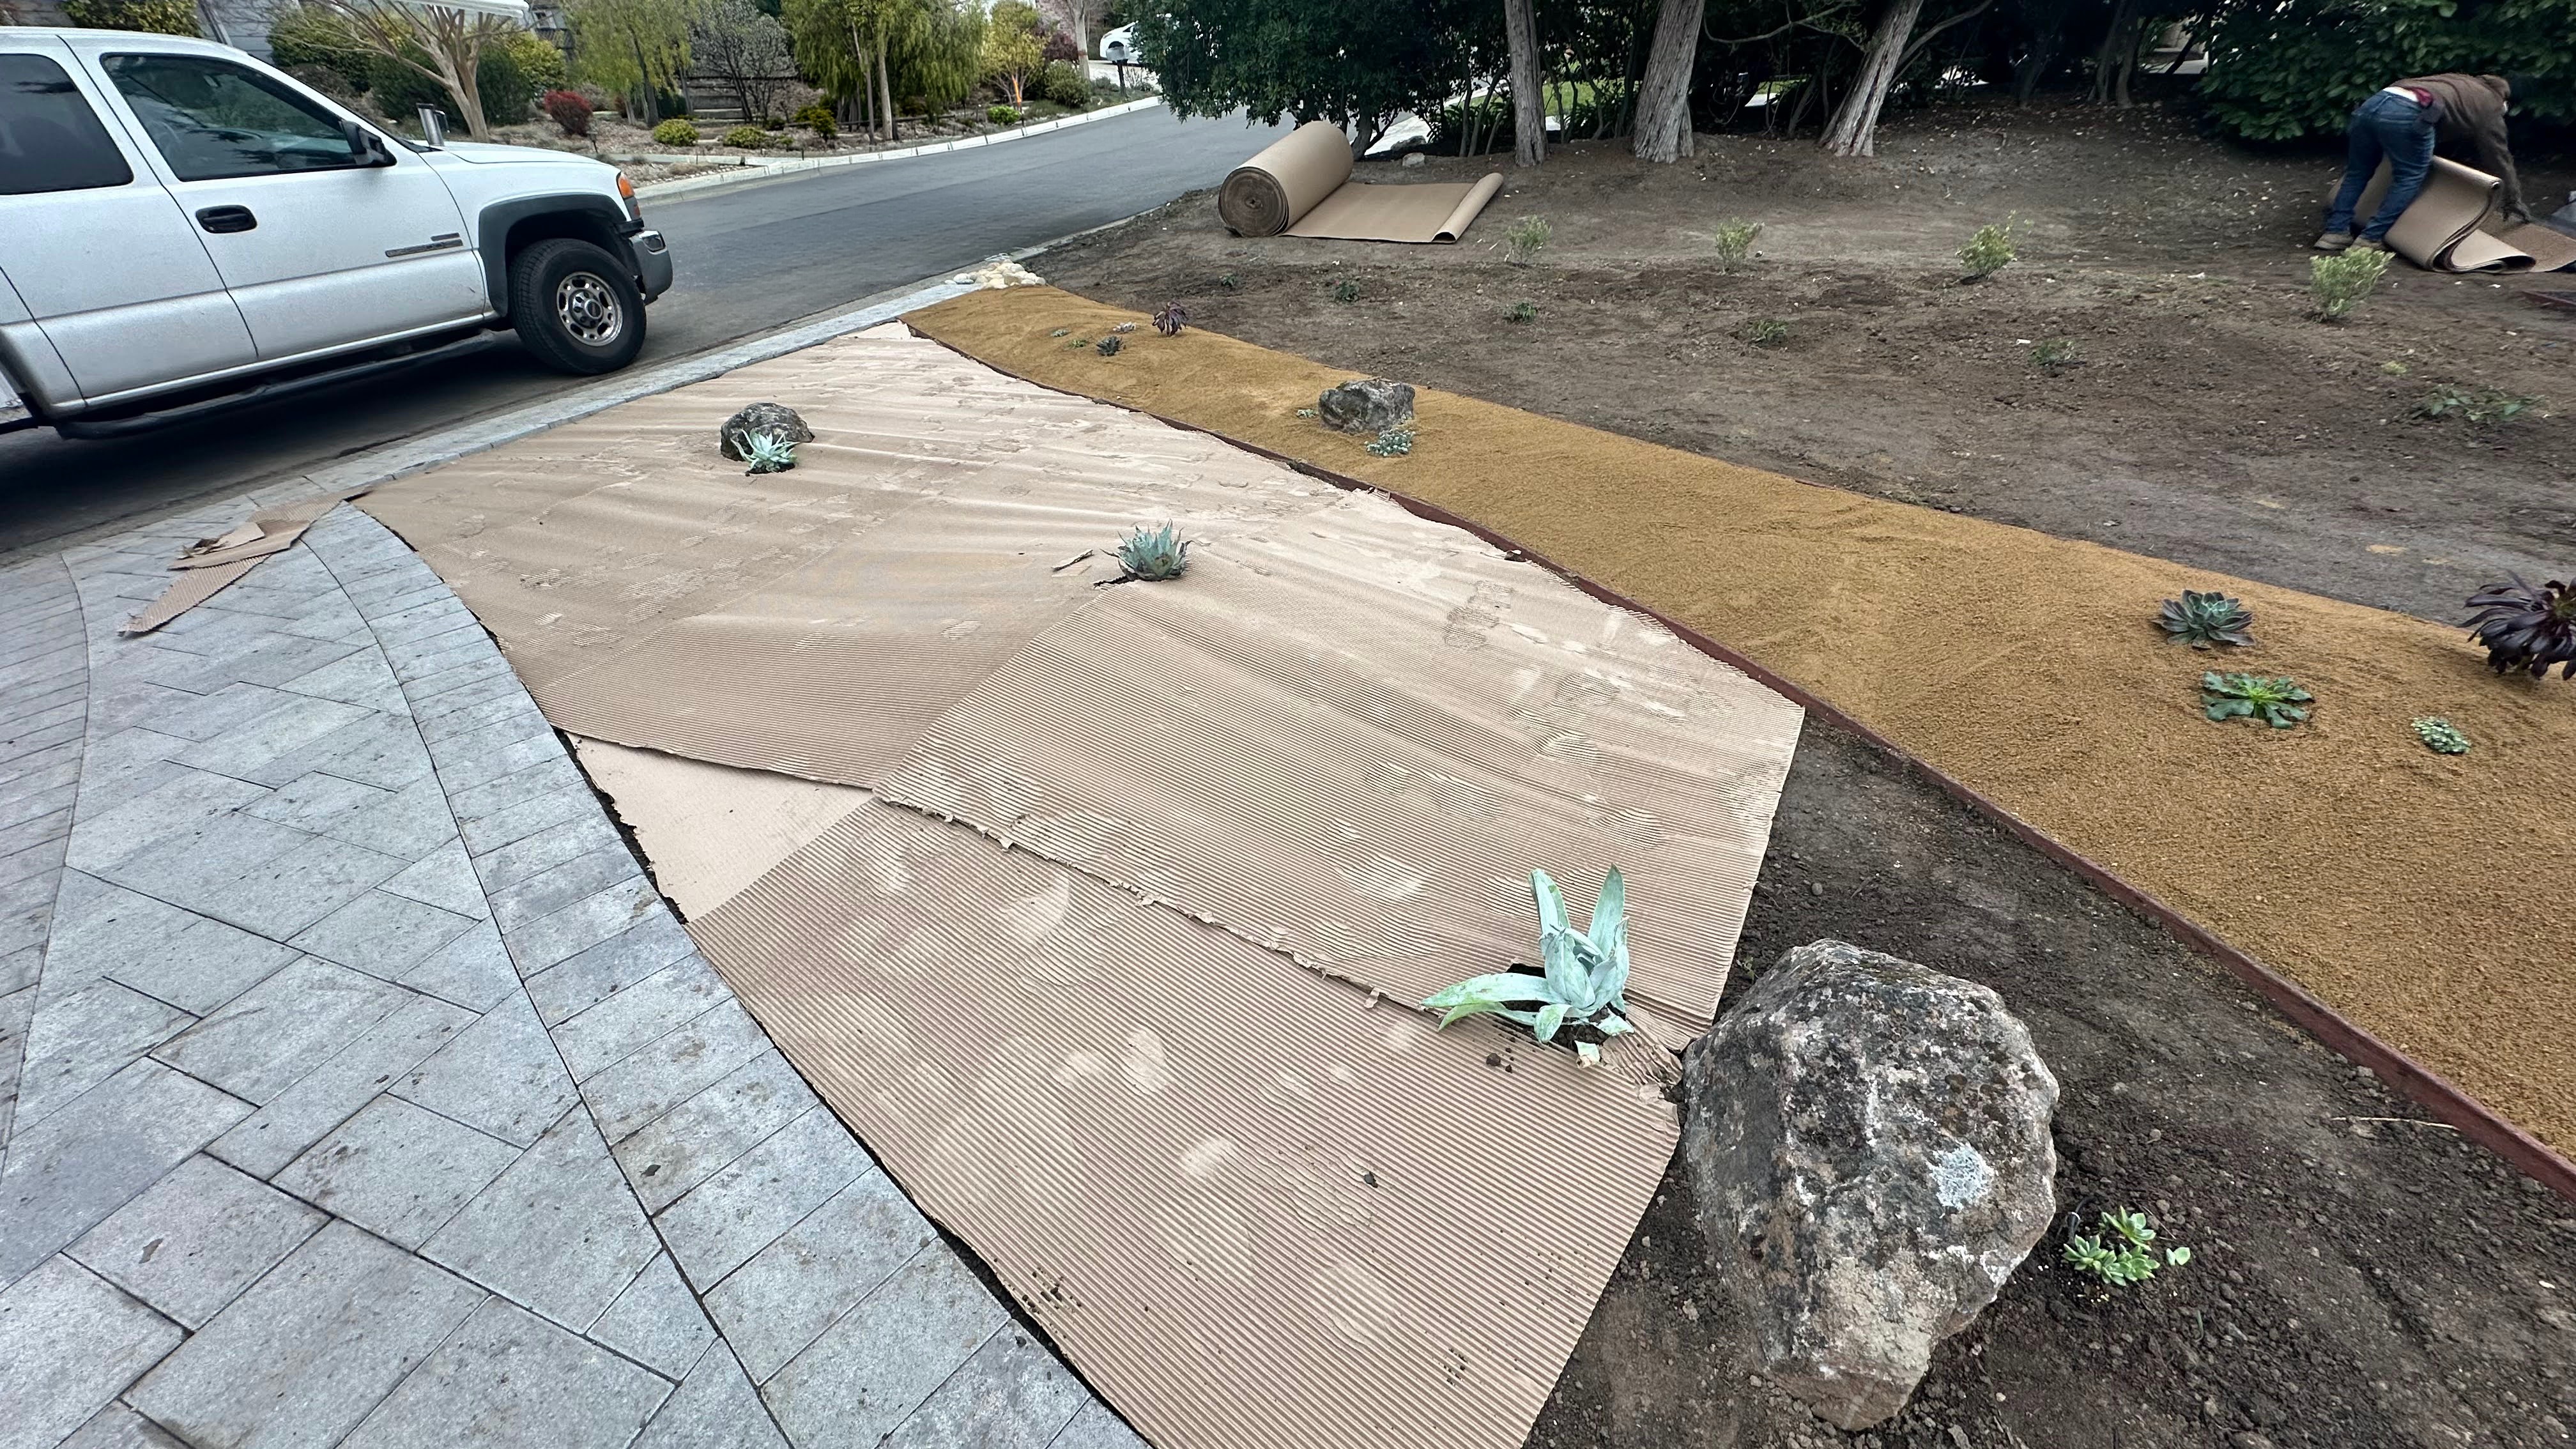
- Cardboard mulch layer and soil amendment
- Rock placement, gravel, DG installation
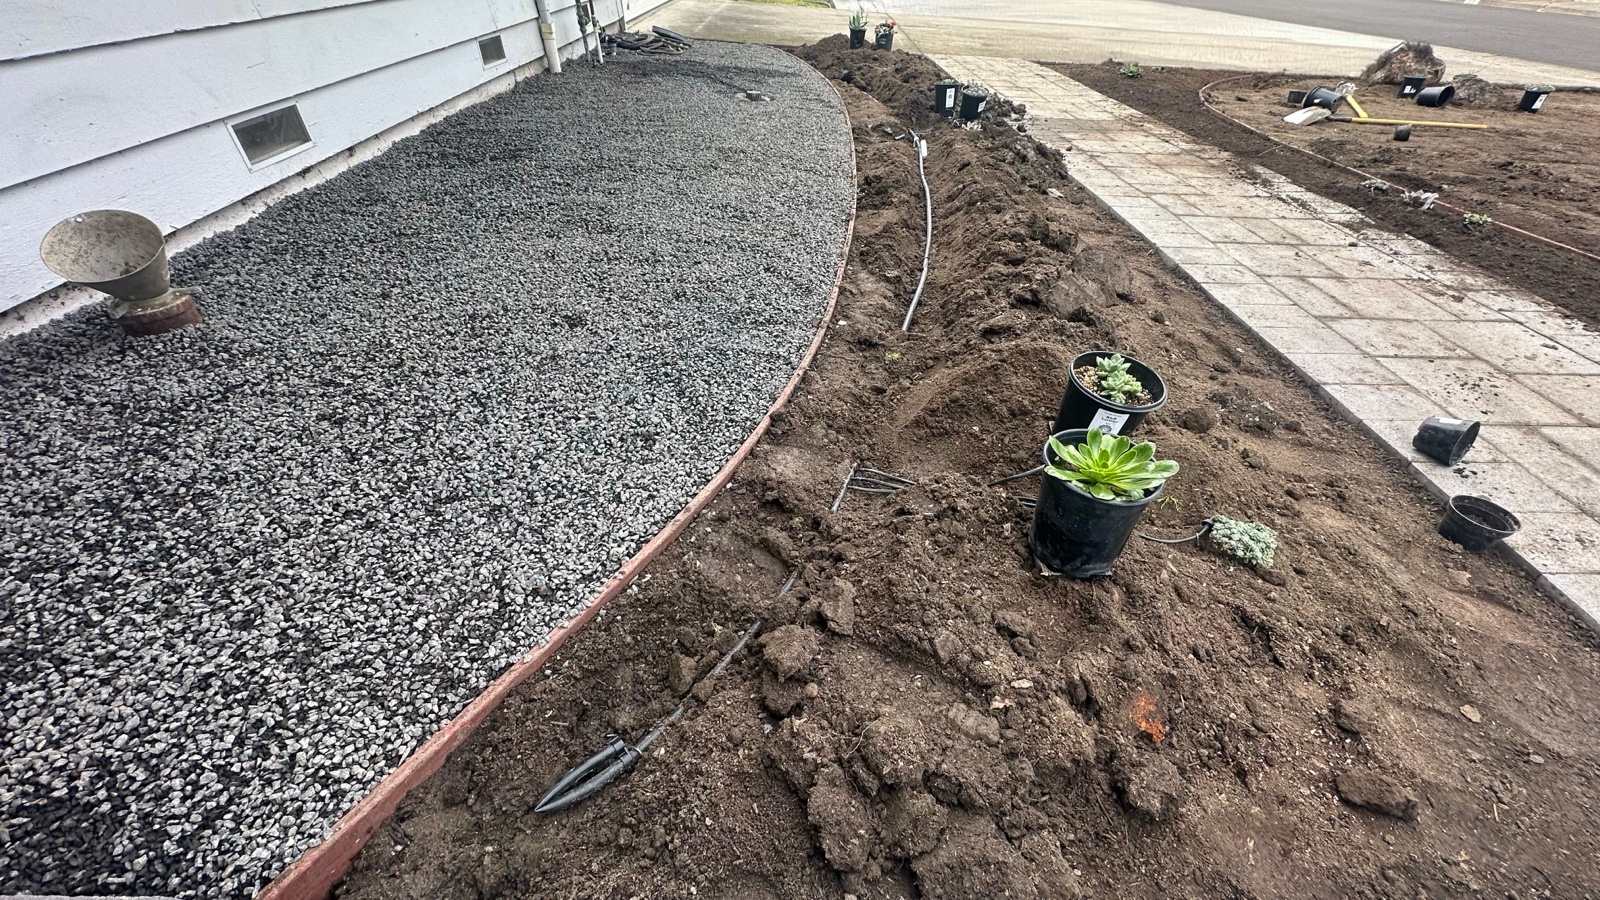
- Composite bender board edging between zones
- Paver hardscape placement
Why this split worked: The hardscape and irrigation need to be done right, drainage especially. If gravel doesn't drain properly it pools, and if drip lines aren't correctly zoned you'll over- or under-water. The planting and design are where a homeowner can save money and get exactly what they want.
Zone Zero: How It Connects
The first 5 feet around the front of the house is now a continuous gravel strip along the foundation. No plants, no organic mulch, nothing combustible.
Beyond the 5-foot line, the California native planting beds begin, separated by composite bender board dividers that create a clean visual and functional boundary. The drip irrigation serves only the planting beds, not the Zone Zero hardscape.
This means if an ember lands near the front of the house, the first thing it encounters is bare mineral ground: gravel, DG, pavers. Not dried mulch, not ornamental grass, not a forgotten doormat.
This is the part of the project that matters most. The aesthetics came out great, but the fire safety is the point.
The EBMUD Rebate Process
The process was straightforward. EBMUD made it easier than expected.
Applying
- Applied through EBMUD's rebate portal. They use satellite photos to gauge your yard size, so it's important that you haven't removed your lawn yet when you apply. You'll be asked to submit photos of the current lawn and your existing irrigation system.
- Received email review within a couple of days. Our first submission needed a small correction (totally normal). They were responsive and clear about what needed fixing.
- Sent our plant list for pre-approval. Once I had the full list of plants by count and species, I sent it to EBMUD so they could confirm we qualified. In our case, that meant the Super Rebate, which requires a majority of California native plants. Getting this confirmed before buying anything saved us from surprises.
- Did the work. Removed the lawn, installed natives, cardboard mulch, drip irrigation, gravel, and hardscape.
- Submitted completion documentation. Photos and a summary document walking through each step (more on this below).
- Received the $2,000 rebate.
We already had a smart irrigation controller from a prior EBMUD rebate, so we didn't need to re-apply for that piece.
Timeline note: For certain rebates like the Super Rebate, your plants need to be in the ground before the end of February (as of this writing; check current requirements). That means you need to apply, get approved, finalize your plant list, and complete the work well ahead of that deadline. Start your planning before the end of the prior year to give yourself enough runway. If you wait until summer you'll miss the planting window and fight establishment all season.
Working with EBMUD
This is the part I want other homeowners to hear: EBMUD's staff were genuinely great to work with.
They were responsive. I typically got answers within a day or two, though your mileage may vary depending on the season. More than that, they were genuinely helpful. When I had questions about mulching approaches (we were using a combination of rock mulch and regular bark mulch), they flagged something I hadn't fully considered: heat sinks. A concentration of rock can capture and retain heat, which can stress certain plants. That kind of proactive, knowledgeable guidance made the project better.
I realized early on that if I communicated what I was planning before I did it, I could avoid missing requirements. Rather than guessing whether something qualified, I'd run it by EBMUD first. Treating it as a collaborative process rather than a checkbox exercise made the whole thing smoother for both sides.
There were actually additional rebates we didn't take advantage of because we already had them in place (like drip irrigation and the smart controller). If you're starting from scratch, check all the available programs. You may qualify for more than you think.
The Pro Tip: Document Everything
Take photos at every stage of your project. You don't need to send them as you go, but you'll need them at the end.
What I did: I packaged up all the progress photos into a single document, described each step, and mapped them to the specific requirements for our rebate targets. The goal was to make it as easy as possible for the EBMUD team to review. They could see at a glance that each requirement was met, with photo evidence for each one.
This approach worked well. If you organize your submission around their criteria rather than just dumping a folder of photos, you'll make their review faster and your approval smoother.
The Numbers
Here's what the project actually cost, broken out by category:
| Item | Approximate Cost |
|---|---|
| Landscaping labor (lawn removal, irrigation, mulching, planting, edging, gravel layout) | $7,000-$8,000 |
| Plants (California natives + succulents, wholesale nursery via landscaper) | $500-$750 |
| Rocks and gravel (local supplier) | $500-$750 |
| Paver walkway (optional, not every project needs this) | Additional |
| Total project | $8,000-$9,500+ |
| EBMUD rebate returned | -$2,000 |
| Net out-of-pocket | $6,000-$7,500+ |
| Ongoing water savings | TBD (first full year) |
The bulk of the cost is labor: demo, drainage, irrigation replumbing, and hardscape installation. That's the part worth paying professionals to do right. The plants and materials were a relatively small share of the total, especially sourcing through a wholesale nursery that our landscaper recommended.
The $2K rebate takes real money off the top. The water savings compound every year. And the fire-safety improvement is priceless. A clean Zone Zero that didn't exist before.
 We just finished our project so our little plants don't look like much right now, but we're hopeful they grow to take advantage of the space we've given them.
What We'd Tell a Neighbor
- Do it for safety. The real payoff is knowing your Zone Zero is clean. The aesthetics came out great too, but that wasn't the primary motivation.
- The rebate takes the sting out. $2K back is real money. It covered the bulk of the materials cost.
- DIY the things you know. Plant selection and design are where your personal taste matters and where you can save. Don't DIY drainage or irrigation. Hire someone who does it every day.
- Design first, demo second. Spending time on the layout before ripping anything out saves expensive mistakes.
- Plan ahead for the calendar. For the Super Rebate, plants must be in the ground before end of February, so start planning before the end of the prior year. Plants established before fire season is the goal.
- Communicate with EBMUD along the way. Don't treat the rebate as a checkbox at the end. Send your plant list for pre-approval, ask questions when you're unsure, and document every stage with photos. Package your final submission around their criteria. It makes their review easier and your approval faster.
- Use a designer if you're unsure. We knew exactly what we wanted, so we designed it ourselves. But there are many wonderful landscape designers in the area, and they often have existing relationships with contractors and suppliers that can smooth out the process.
Why This Matters to Us
Zone Zero is where we started, but it's not where we're stopping. This project reinforced how we think about our home, our neighborhood, and what it actually means to be ready for fire season in Lamorinda.
We've been working on this main site for the past few months. It's something I wanted to build for homeowners like us: a place to share learnings and insights about protecting our families and living in this area safely. We're rolling it out in stages. The education content and local fire news are live now, and we're releasing more tools as we finish them.
If you're curious, come take a look at what we're building, and if you want updates as new guides and tools land, there's a newsletter signup at the bottom of every page.